
A low-cost wireless Arduino
Some days ago I received my first Lilypad Arduino and started to experiment with a SMD Bluetooth module i bought from Sparkfun. The connection between the BT module and the Arduino board has been described here by Leah Buechley, but instead of using a BlueSmirf Gold Board (which is based upon a Roving Networks module and costs more than 60$) I tried the less expensive Sparkfun SMD module.
From a software point of view, the only difference is the command set when the module is in COMMAND mode.
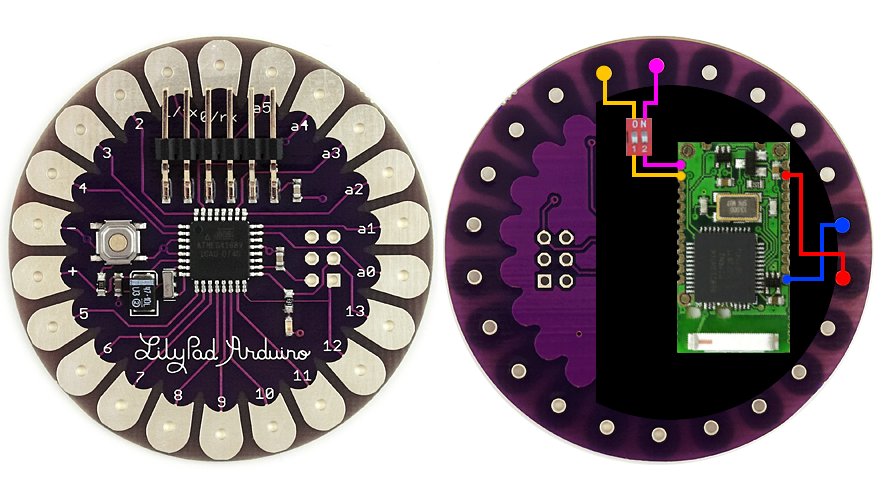
First of all I covered the back side of my Lilypad Arduino with a layer of insulating pvc tape, then, using a small piece of biadhesive tape, I secured the Bluetooth module over the pvc tape.
The connections are quite easy as you may notice from the picture, the only detail that's worth a mention is the small 2 way smd dip switch between the crossed RX/TX connection to Arduino pins, in order to disable the module communication with the ATMega chip when using the USB programmer to load a sketch, since with Lilypad standard bootloader it's not possible to load sketches via Bluetooth.
From a software point of view, the only difference is the command set when the module is in COMMAND mode.
First of all I covered the back side of my Lilypad Arduino with a layer of insulating pvc tape, then, using a small piece of biadhesive tape, I secured the Bluetooth module over the pvc tape.
The connections are quite easy as you may notice from the picture, the only detail that's worth a mention is the small 2 way smd dip switch between the crossed RX/TX connection to Arduino pins, in order to disable the module communication with the ATMega chip when using the USB programmer to load a sketch, since with Lilypad standard bootloader it's not possible to load sketches via Bluetooth.
At this point there are two possible ways of changing the configuration of the module:
Configuring the module within an Arduino Sketch
At the end of the page you will find a short arduino sketch which allows to modify the configuration of the BT module, just edit the first rows to fit your needs, and then:
Configuring the module using the USB-Serial converter
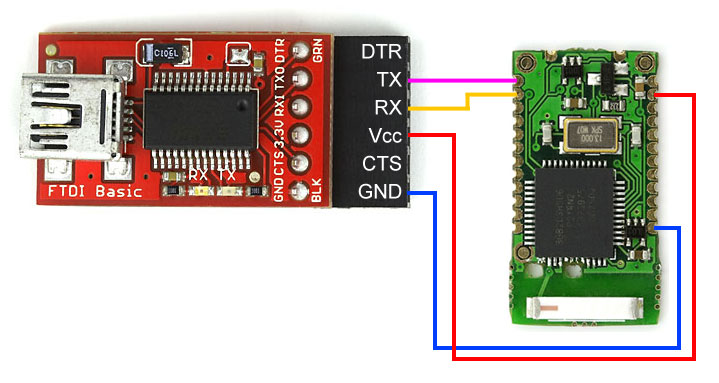
Connect your USB-Serial converter (or even a MAX232-based one) as described in the drawing below, then open any terminal application (like HyperTerminal, if you're using windows) and configure the serial port of the USB-Serial converter (or to your pc COM port if you're using a MAX232 board) using these settings:
Bluetooth SMD module: 29.95$
Lilypad Arduino: 21.95$
USB-Serial converter: 13.95$ (if you don't have any)
Configuring the module within an Arduino Sketch
At the end of the page you will find a short arduino sketch which allows to modify the configuration of the BT module, just edit the first rows to fit your needs, and then:
- Use the dip switch to disable communication between Arduino and the BT module
- Edit the sketch to fit your needs and load it on the Lilypad using a USB-Serial converter
- Plug out your USB-Seral converter
- Use the dip switch to enable communication again
- Power up Arduino using a battery or an external power supply
- Connect via Bluetooth to the module (if asked for a password, the default pin is "0000") and enter "+++" in the terminal window to enter command mode (you should not see anything in the terminal window) then hit the reset button on the Lilypad
- Wait until the led flashes and then you are done!
- Remember to switch off the communication with the module if you wanto to load a new sketch
Configuring the module using the USB-Serial converter
Connect your USB-Serial converter (or even a MAX232-based one) as described in the drawing below, then open any terminal application (like HyperTerminal, if you're using windows) and configure the serial port of the USB-Serial converter (or to your pc COM port if you're using a MAX232 board) using these settings:
- Baud Rate: 9600
- Data bits: 8
- Stop bits: 1
- Parity: none
- Flow Control: none
- Open another terminal and connect to your Bluetooth module using SPP (default PIN is "0000")
- Also connect to the serial port of the USB-Serial converter in the other terminal window
- Enter "+++" in the Bluetooth terminal window
- The module is now in COMMAND mode, if everything worked fine you should see the module entering COMMAND mode, now you can use the USB-Serial terminal window to send configuration commands to the module (see the BGB203 SPP User Guide)
Bluetooth SMD module: 29.95$
Lilypad Arduino: 21.95$
USB-Serial converter: 13.95$ (if you don't have any)
	int LED = 13;


	void setup()

	{

	  pinMode(LED, OUTPUT); // set direction of led pin


	  //default SparkFun BT module baud rate

	  Serial.begin(9600);


	  //Change module name

	  Serial.print("AT+BTLNM="wirelessLilypad" ");

	  delay(500);


	  //Change UART settings (baud rate, data bits, stop bits, parity, stop bits, flow control)

	  Serial.print("AT+BTURT=57600, 8, 0, 1, 0 ");

	  delay(500);


	  //Write settings on BGB203 flash memory

	  Serial.print("AT+BTFLS ");

	  delay(500);


	  //Start Bluetooth Server

	  Serial.print("AT+BTSRV=1 ");

	  delay(500);


	}


	void loop()

	{

	  //Led blinking

	  while(1){

	    digitalWrite(LED, HIGH);

	    delay(500);

	    digitalWrite(LED, LOW);

	    delay(500);

	  }

	}